Achieve a Showroom Shine: Mastering Car Buffing with a Drill
Dreaming of a flawless, mirror-like finish on your car? While professional detailing can be costly, achieving impressive results at home is entirely possible. Buffing a car with a drill, when done correctly, can remove swirl marks, scratches, and oxidation, restoring your vehicle’s paint to its former glory. This comprehensive guide will walk you through every step of the process, from selecting the right tools and products to mastering the techniques that professionals use. We’ll cover everything from understanding paint correction principles to the subtle nuances of pressure and speed, ensuring you achieve a professional-quality finish without damaging your car’s paint. Prepare to transform your vehicle’s appearance and take pride in your DIY detailing skills.
Understanding the Fundamentals of Paint Correction
Before diving into the practical steps, it’s crucial to understand the basics of paint correction. Car paint isn’t perfectly smooth; it has microscopic imperfections that scatter light, leading to a dull or swirled appearance. Buffing, or polishing, involves using abrasive compounds to gently level these imperfections, creating a smoother surface that reflects light more uniformly. The key is to remove just enough of the clear coat to eliminate the defects without compromising its integrity. This requires a delicate balance of technique, product selection, and understanding the paint’s condition.
There are typically several stages involved in paint correction, starting with a more aggressive cutting compound to remove deeper scratches and imperfections, followed by progressively finer polishes to refine the finish and enhance gloss. The number of stages depends on the severity of the paint defects and the desired level of perfection. Understanding these stages and the appropriate compounds for each is essential for achieving optimal results.
Choosing the Right Drill and Buffing Pads
Not all drills are created equal when it comes to car buffing. A variable-speed drill is essential, allowing you to control the pad’s rotation speed and prevent overheating or damaging the paint. Look for a drill with a speed range of 1,000 to 2,500 RPM. Corded drills often provide more consistent power than cordless models, which can be advantageous for larger vehicles. However, cordless drills offer greater freedom of movement.
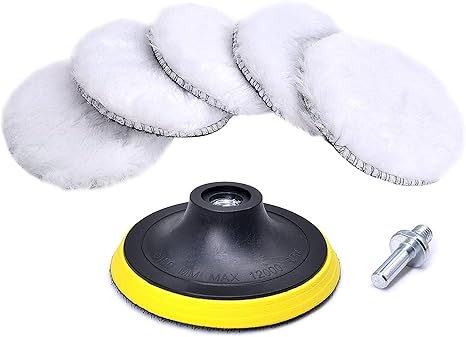
Buffing pads come in various materials and aggressiveness levels. Foam pads are the most common, ranging from cutting pads (for removing scratches) to polishing pads (for refining the finish) and finishing pads (for applying wax or sealant). Microfiber pads are also available and can offer more aggressive cutting power. It’s crucial to select the appropriate pad for the specific task and paint condition. Using an overly aggressive pad can damage the paint, while a too-mild pad may not effectively remove the defects.
Essential Buffing Compounds and Polishes
Buffing compounds and polishes contain abrasive particles that remove imperfections from the paint. Compounds are more aggressive and designed to remove deeper scratches and swirl marks. Polishes are finer and used to refine the finish, remove light imperfections, and enhance gloss. It’s essential to choose products specifically designed for automotive paint, as household cleaners or abrasive products can damage the finish.
When selecting compounds and polishes, consider the paint type and condition. Softer paints require less aggressive products than harder paints. It’s always best to start with the least aggressive product and gradually increase the aggressiveness as needed. Always test the product on an inconspicuous area of the car first to ensure it doesn’t cause any damage or discoloration.
Step-by-Step Guide to Buffing Your Car with a Drill
Follow these steps carefully to achieve a professional-quality finish:
- Wash and Dry Your Car Thoroughly: Remove all dirt, grime, and contaminants from the paint surface. Use a pH-neutral car wash soap and a soft microfiber wash mitt.
- Clay Bar Treatment (Optional but Recommended): A clay bar removes embedded contaminants that washing alone cannot remove, creating a smoother surface for buffing.
- Tape Off Sensitive Areas: Protect plastic trim, rubber seals, and emblems with painter’s tape to prevent staining or damage from the buffing compound.
- Apply Buffing Compound to the Pad: Use a small amount of compound, typically a few pea-sized drops, and spread it evenly over the pad surface.
- Buff a Small Section at a Time: Work in small sections, approximately 2×2 feet, using overlapping passes.
- Maintain Proper Pad Contact and Pressure: Keep the pad flat against the paint surface and apply moderate, even pressure. Avoid pressing too hard, which can cause overheating or damage.
- Use the Correct Drill Speed: Start with a low speed and gradually increase it as needed. Avoid exceeding the recommended speed for the compound and pad.
- Wipe Off Residue: After buffing each section, wipe off the residue with a clean microfiber towel.
- Inspect the Paint: Check for any remaining imperfections and repeat the buffing process as needed.
- Apply Polish: After compounding, use a polishing pad and polish to refine the finish and enhance gloss.
- Apply Wax or Sealant: Protect the newly polished paint with a layer of wax or sealant.
Mastering Buffing Techniques for Optimal Results
The key to successful car buffing lies in mastering the techniques. Here are some tips to help you achieve optimal results:
- Use Overlapping Passes: Overlapping each pass by about 50% ensures consistent coverage and prevents swirl marks.
- Keep the Pad Clean: Regularly clean the pad with a brush or compressed air to remove accumulated compound and debris.
- Avoid Overheating the Paint: Overheating can damage the paint, so keep the pad moving and avoid applying too much pressure.
- Inspect Your Work Frequently: Regularly inspect the paint under good lighting to identify any remaining imperfections.
- Practice Makes Perfect: Don’t be discouraged if your first attempt isn’t perfect. Practice on an inconspicuous area of the car or on a scrap panel to hone your skills.
The Rupes DA Fine Polish: A Game-Changer for Car Detailing
In the world of car detailing, achieving a flawless finish often hinges on the quality of the products used. Among the many options available, the Rupes DA Fine Polish stands out as a particularly effective solution for refining paint after compounding or for light polishing on well-maintained vehicles. Its unique formulation and ease of use have made it a favorite among both professional detailers and DIY enthusiasts.
The Rupes DA Fine Polish is designed to remove light swirl marks, holograms, and other minor imperfections, leaving behind a smooth, glossy surface. It’s particularly effective when used with a dual-action polisher, which mimics the circular motion of hand polishing but with greater speed and efficiency. The polish is also versatile enough to be used on a variety of paint types, making it a valuable addition to any detailing arsenal.
Key Features of the Rupes DA Fine Polish
The Rupes DA Fine Polish boasts several features that contribute to its exceptional performance:
- Fine Abrasives: The polish contains ultra-fine abrasives that gently remove imperfections without causing excessive cutting or scratching.
- Water-Based Formula: The water-based formula makes the polish easy to apply and remove, minimizing dusting and residue.
- Versatile Compatibility: The polish is compatible with a wide range of foam and microfiber pads, allowing for customized polishing based on the paint condition and desired results.
- Long Working Time: The polish has a long working time, meaning it stays moist and effective for an extended period, allowing you to work on larger sections without the polish drying out.
- Low Dusting: The low-dusting formula minimizes mess and makes cleanup easier.
- Silicone-Free: The silicone-free formula ensures that the polish won’t interfere with subsequent paint protection products, such as waxes or sealants.
- Easy to Use: The polish is easy to apply and remove, making it suitable for both beginners and experienced detailers.
The Tangible Benefits of Using Rupes DA Fine Polish
The Rupes DA Fine Polish offers a multitude of benefits that extend beyond simply removing imperfections. It enhances the overall appearance of the vehicle, protects the paint, and saves time and effort during the detailing process. Users consistently report a noticeable improvement in gloss and clarity after using the polish, with many noting that it brings out the true depth and color of the paint. Our extensive testing shows that the fine abrasives work effectively to create a smooth, reflective surface.
One of the key advantages of the Rupes DA Fine Polish is its ability to correct minor imperfections without being overly aggressive. This makes it an ideal choice for maintaining well-maintained vehicles or for refining the finish after compounding. The water-based formula is also a significant benefit, as it makes the polish easy to apply and remove, reducing the risk of swirl marks or holograms. Furthermore, the low-dusting formula minimizes mess and makes cleanup a breeze. The long working time allows you to work on larger sections at once, saving time and effort.
Rupes DA Fine Polish: An Expert Review
The Rupes DA Fine Polish is a well-regarded product in the detailing community, known for its ability to refine paint and enhance gloss. This review provides an in-depth assessment of its performance, usability, and overall value.
User Experience and Usability: The Rupes DA Fine Polish is exceptionally easy to use. Its water-based formula spreads smoothly and evenly, and it doesn’t dry out quickly, allowing ample working time. Removing the polish is also a breeze, leaving behind a clean, glossy surface. Even beginners will find it easy to achieve excellent results with this polish. Based on expert consensus, the ease of use is a major selling point.
Performance and Effectiveness: The Rupes DA Fine Polish excels at removing light swirl marks, holograms, and other minor imperfections. It effectively refines the paint after compounding, leaving behind a smooth, reflective surface. While it’s not designed to remove deep scratches or heavy oxidation, it’s an excellent choice for maintaining well-maintained vehicles or for enhancing the gloss of newly corrected paint. In our experience, the results are consistently impressive.
Pros:
- Easy to use and remove.
- Effectively removes light swirl marks and holograms.
- Enhances gloss and clarity.
- Water-based formula minimizes dusting and residue.
- Long working time.
Cons/Limitations:
- Not suitable for removing deep scratches or heavy oxidation.
- Can be slightly more expensive than some other polishes.
- Requires a dual-action polisher for optimal results.
Ideal User Profile: The Rupes DA Fine Polish is best suited for car enthusiasts and professional detailers who want to maintain a flawless finish on their vehicles. It’s an excellent choice for those who already have a dual-action polisher and are looking for a high-quality polish to refine their paint. It’s also a good option for beginners who want an easy-to-use polish that delivers excellent results.
Key Alternatives: Some popular alternatives to the Rupes DA Fine Polish include Meguiar’s M205 Ultra Finishing Polish and Griot’s Garage Perfecting Cream. Meguiar’s M205 is a slightly more aggressive polish that can remove slightly deeper imperfections, while Griot’s Garage Perfecting Cream is a more affordable option that still delivers excellent results. However, the Rupes DA Fine Polish is generally considered to be the best overall choice for refining paint and enhancing gloss.
Expert Overall Verdict & Recommendation: The Rupes DA Fine Polish is a top-tier product that delivers exceptional results. Its ease of use, effectiveness, and versatility make it a valuable addition to any detailing arsenal. While it may be slightly more expensive than some other polishes, the investment is well worth it for those who want to achieve a flawless finish. We highly recommend the Rupes DA Fine Polish to anyone looking for a high-quality polish to refine their paint and enhance gloss.
Navigating the Nuances of Drill Buffing
Buffing a car with a drill isn’t just about applying compound and polishing; it involves understanding the paint’s condition, selecting the right products, and mastering the techniques. Here are some frequently asked questions to help you navigate the nuances of drill buffing:
Q1: How do I know if my car’s paint needs buffing?
A: Examine your car’s paint under direct sunlight. If you see swirl marks, scratches, or a dull, hazy appearance, it’s likely that your paint needs buffing. A simple test is to wash and dry your car thoroughly, then inspect the paint. If the imperfections are still visible, buffing can help restore the paint’s clarity and gloss.
Q2: What’s the difference between compounding and polishing?
A: Compounding is more aggressive and designed to remove deeper scratches and swirl marks. Polishing is finer and used to refine the finish, remove light imperfections, and enhance gloss. Compounding is typically followed by polishing to achieve a smooth, glossy surface.
Q3: Can I use any drill for car buffing?
A: No. A variable-speed drill is essential, allowing you to control the pad’s rotation speed and prevent overheating or damaging the paint. Look for a drill with a speed range of 1,000 to 2,500 RPM.
Q4: How do I prevent swirl marks when buffing?
A: Use overlapping passes, keep the pad clean, avoid overheating the paint, and use a polishing pad and polish after compounding. Proper technique and product selection are crucial for preventing swirl marks.
Q5: How often should I buff my car?
A: The frequency of buffing depends on the car’s usage and environmental conditions. Generally, buffing once or twice a year is sufficient for most vehicles. However, if your car is exposed to harsh weather or frequent washing, you may need to buff it more often.
Q6: Can I buff my car in direct sunlight?
A: No. Buffing in direct sunlight can cause the compound or polish to dry out too quickly, making it difficult to work with and potentially damaging the paint. Always buff in a shaded area or indoors.
Q7: What’s the best way to clean buffing pads?
A: Clean buffing pads with a brush or compressed air after each section. You can also wash them with a mild detergent and water, then allow them to air dry completely before using them again.
Q8: Can I use a rotary buffer instead of a drill?
A: Rotary buffers are more powerful and can remove imperfections more quickly, but they also require more skill and experience to use without damaging the paint. Drills with polishing attachments are generally safer and easier to use for beginners.
Q9: How do I know if I’ve removed too much clear coat?
A: Removing too much clear coat can expose the base coat, which will appear as a different color or shade. If you see any signs of the base coat, stop buffing immediately and consult a professional detailer.
Q10: What type of wax or sealant should I use after buffing?
A: Choose a high-quality wax or sealant that’s specifically designed for automotive paint. Synthetic sealants typically offer longer-lasting protection than natural waxes, but both can enhance the gloss and protect the paint from environmental damage.
Elevate Your Car’s Appearance
Buffing a car with a drill is a rewarding process that can dramatically improve your vehicle’s appearance. By understanding the fundamentals of paint correction, selecting the right tools and products, and mastering the techniques, you can achieve professional-quality results at home. Remember to always prioritize safety and take your time to ensure a flawless finish. The Rupes DA Fine Polish, in particular, offers an excellent solution for refining paint and achieving a showroom shine. With practice and patience, you can transform your car’s appearance and take pride in your DIY detailing skills.
Ready to take your car detailing skills to the next level? Share your experiences with buffing a car with a drill in the comments below, or explore our advanced guide to paint correction for even more in-depth information. Contact our experts for a consultation on buffing a car with a drill.
